 Landing Page


OK, so here is my current camera mount mods. I haven't finished constructing all the parts yet but I think these pics get the idea across for what I'm doing.
I wanted a mounting system that was versatile. One that allowed me to reconfigure it for different mounting angles. It needed to be light weight but also sturdy enough to be camera steady. I wanted it to break down and be transportable as well. It needed to be waterproof and able to easily attach to my existing rod rack system.
The material I use for construction is PVC. I don't like my finished product to look like plumbing hanging off of my tube. As you can tell from the pic I reshape the PVC for a more polished look.
[You must be registered and logged in to see this link.]
Mounts can be disassembled.
[You must be registered and logged in to see this link.]
Even tho' I am not finished constructing all of my parts you can see that because I can break down all the parts I can reconfigure them in many different ways.
[You must be registered and logged in to see this link.]
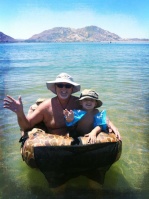
So the long awaited reveal...where do I mount those cams? Meet my camera crew when I go Float Tubing:
The Action Cam:
[You must be registered and logged in to see this link.]
The Selfie Cam:
[You must be registered and logged in to see this link.]
The Shoulder Cam:
[You must be registered and logged in to see this link.]
The Catch and Release Cam:
[You must be registered and logged in to see this link.]
(This configuration is currently in a redesign stage. It works as it is but I since discovered some nice improvements.)
The Point of View Cam:
[You must be registered and logged in to see this link.]
The 3rd Person (Cooler Cam):
[You must be registered and logged in to see this link.]
The Rod Rack system I have is still my prototype. The finished one is being constructed. It will exist on both side of the tube. It will have six vertical and four angled rod holders.
My camera mounts easily attach to any of the rod holders giving me ten places to attach the camera mounts.
I only have three waterproof action cams. All three are controlled with remotes. I can of course change the position and angle of any of them at anytime.
I can also use my Galaxy S5 to take pics or video. But my primary use of it is in in wifi remote operation. This allows me to frame my cameras if I need to. Using my Smartphone in this manner was tricky as it proved to drain it down pretty hard. Thus the Jarv Tank. I can recharge my S5 four times, quickly, right there on my float tube.
The Olympus goes in my external pocket on my fishing vest to take quick pics.
The Canon is not waterproof. It is for shooting trip, location, and shoreline/launch footage.
I bet many of you are wondering if the Cooler Cam works. It was an idea and I wasn't sure about it myself. But it surprisingly works great! In fact if you look at the pics in my tournament report you'll see just how well it works. I can tow it, tether it and position anchor it with it working amazingly well. Not to mention the cold refreshments it provides!
Well that's where I'm at with mounting my cams.
Big Fish
I wanted a mounting system that was versatile. One that allowed me to reconfigure it for different mounting angles. It needed to be light weight but also sturdy enough to be camera steady. I wanted it to break down and be transportable as well. It needed to be waterproof and able to easily attach to my existing rod rack system.
The material I use for construction is PVC. I don't like my finished product to look like plumbing hanging off of my tube. As you can tell from the pic I reshape the PVC for a more polished look.
[You must be registered and logged in to see this link.]
Mounts can be disassembled.
[You must be registered and logged in to see this link.]
Even tho' I am not finished constructing all of my parts you can see that because I can break down all the parts I can reconfigure them in many different ways.
[You must be registered and logged in to see this link.]
So the long awaited reveal...where do I mount those cams? Meet my camera crew when I go Float Tubing:
The Action Cam:
[You must be registered and logged in to see this link.]
The Selfie Cam:
[You must be registered and logged in to see this link.]
The Shoulder Cam:
[You must be registered and logged in to see this link.]
The Catch and Release Cam:
[You must be registered and logged in to see this link.]
(This configuration is currently in a redesign stage. It works as it is but I since discovered some nice improvements.)
The Point of View Cam:
[You must be registered and logged in to see this link.]
The 3rd Person (Cooler Cam):
[You must be registered and logged in to see this link.]
The Rod Rack system I have is still my prototype. The finished one is being constructed. It will exist on both side of the tube. It will have six vertical and four angled rod holders.
My camera mounts easily attach to any of the rod holders giving me ten places to attach the camera mounts.
I only have three waterproof action cams. All three are controlled with remotes. I can of course change the position and angle of any of them at anytime.
I can also use my Galaxy S5 to take pics or video. But my primary use of it is in in wifi remote operation. This allows me to frame my cameras if I need to. Using my Smartphone in this manner was tricky as it proved to drain it down pretty hard. Thus the Jarv Tank. I can recharge my S5 four times, quickly, right there on my float tube.
The Olympus goes in my external pocket on my fishing vest to take quick pics.
The Canon is not waterproof. It is for shooting trip, location, and shoreline/launch footage.
I bet many of you are wondering if the Cooler Cam works. It was an idea and I wasn't sure about it myself. But it surprisingly works great! In fact if you look at the pics in my tournament report you'll see just how well it works. I can tow it, tether it and position anchor it with it working amazingly well. Not to mention the cold refreshments it provides!
Well that's where I'm at with mounting my cams.
Big Fish